

UPDATED: 22/7/2019
Find a new updated manual at Help.eventee.co. 🧐
Once you're reading this, you have probably decided that you want to have a mobile app at your event. That's a good step forward to make your event more interactive and to boost the attendee engagement. It should not surprise you when I tell you that people use mobile phones a lot. And they probably would do that also during lectures at your event because mostly it is just a habit. So what if you could take an advantage of this fact and create a digital space in their phone, where your event would be present as well?
There are many ways to handle Eventee features. But once you decide to have a mobile app on your conference, you should maximize the impact of that decision. That's also the reason why we've created this manual which includes the best practices from our clients, so that you don't need to figure them out by yourself.
This article is a little bit longer than the others, therefore we recommend taking a cup of coffee, read the article and actually try the things out after each chapter 😊
PLANNING PHASE
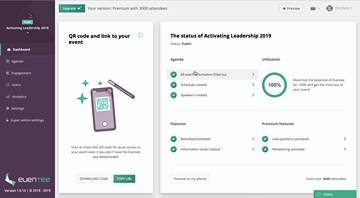
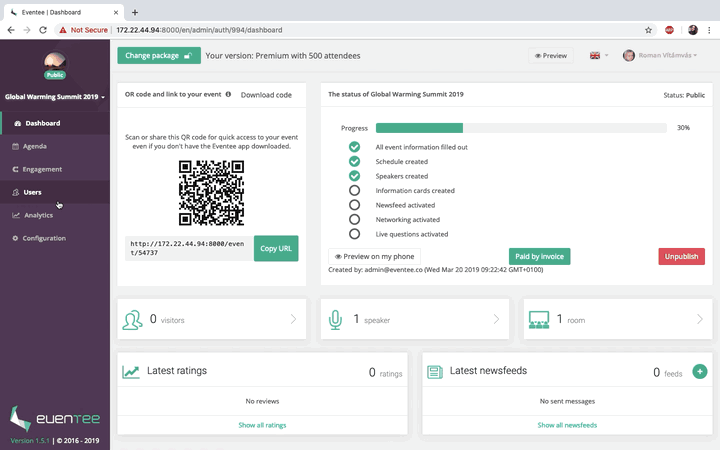
Let's take it step by step. When you register through our website, you are asked to create a new event. After filling some basic information about your event, you are directed to Schedule in your Admin menu, where you will probably spend the most of your planning time.
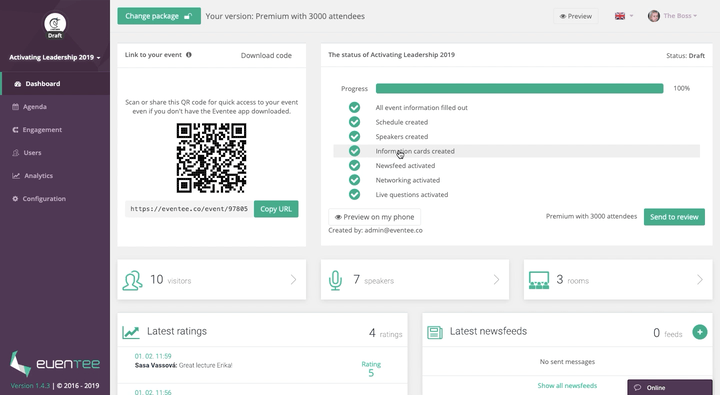
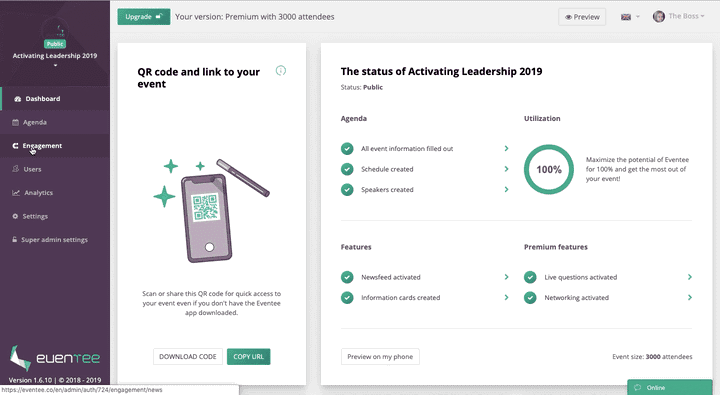
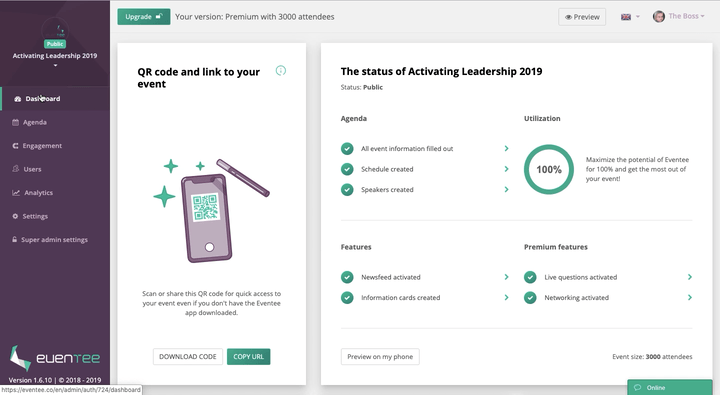
After you click on Dashboard, on the right side you can see a list with The Status of your event and Utilization. It is a good navigator for you because you can control which information you have already filled in, and which not. By clicking on each of the items in the list, you will be directed to the target page.

Remember that during your planning phase, you can preview the event in your mobile phone. Click on the “Preview on my phone” button next to the "Pay and publish" button and follow the instructions.
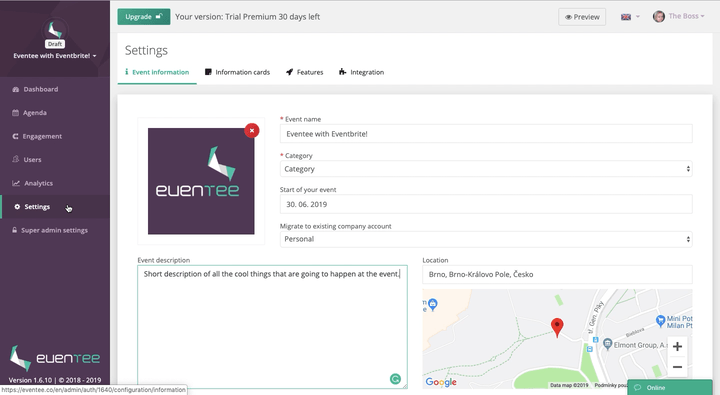
Event Information
In the configuration, you have a card Event information. You should upload your event logo there and fill in some basic information such as event name, category, the time of the event and a short description for your attendees. The description could be basically anything, there are no limits for your imagination. However it cannot be longer than 512 characters. After the review process and successful publication, your event will be visible in Eventee as follows
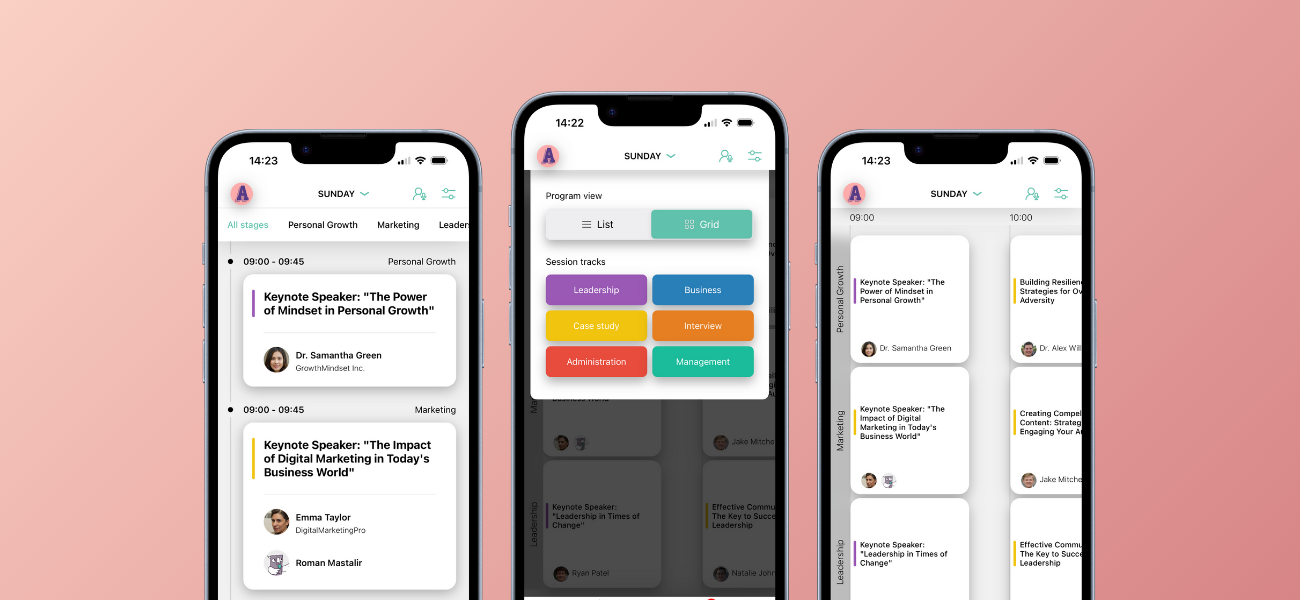
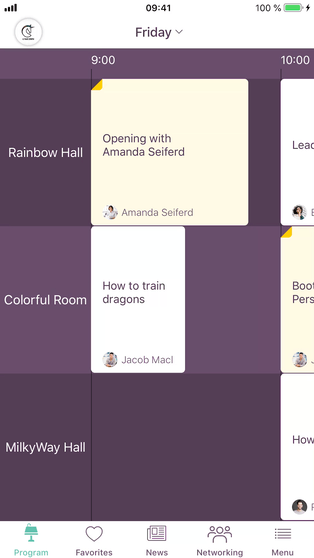
Schedule
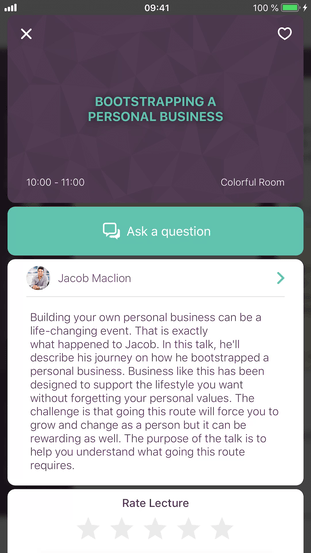
Schedule is the space where the magic happens. If you have Premium version, you can create multiple rooms and schedule for more than one day. You can also add coffee or networking breaks at your wish. On each individual lecture you can add description to motivate your attendees to go there. Moreover, you can also separately decide on which lectures you want to enable live questions.
- No more useless printing of agenda
- Possibility to make real-time changes in agenda
- Possibility to add all the info to each individual lecture and set the right expectations.
The preview on a mobile app is following
Speakers
In this section, you can create information cards for each of your speakers. You can fill in information such as name, company, BIO, etc. And what is more important - you can fill in all the contacts which the speaker wants to share with the attendees. This is the easiest way to ensure that your attendees can connect with your speakers and approach them later with any question. With just one click in the app, attendees can write them email or add them to their LinkedIn network.
- You can easily connect attendees with speakers;
- With interesting BIO you can motivate attendees to choose between lectures.
And how does it work for the attendee?
The easiest way to get the information about your speakers is to ask them for the information they want to share with the attendees, and rewrite them into Eventee. Here is the list of all information which the speaker can share with the attendees in Eventee: First and Last name, Company, Job, BIO, Email, Phone number, Web, LinkedIn, Facebook, Twitter, Country, Language.
Newsfeed
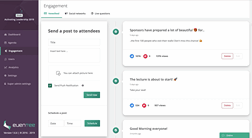
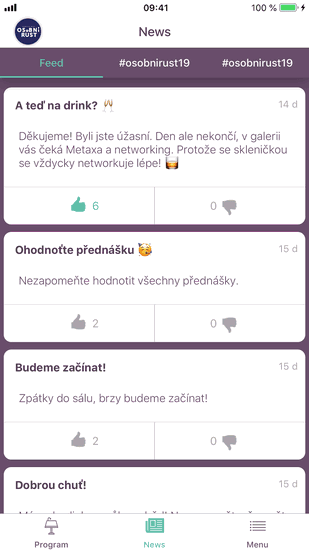
Newsfeed is the tool which ensures smooth flow of information between you and your attendees. It can help you to boost the engagement and to communicate everything you need. There are no limits, you can post pictures, GIFs, plain texts - at any time. You can choose to send the messages with push notifications which ensures that your attendees won't miss any important news.
How does it work?
- Plan and schedule all the posts in advance;
- Write and send the posts in real time during the event;
- Combine these two approaches
For example, you know that there will be a coffee break at 8 AM and the first lecture starts at 9 AM. You schedule an announcement for 8:45 AM, which tells the attendees that they should come to the main hall in a few minutes. Afterwards, if you see that people are not coming yet, you can send them another reminder straight from your mobile phone.
You can use the newsfeed to tell your attendees everything you need and want. Few examples
- Announce the start and end of each break;
- Remind attendees to give feedback to the speakers after sessions;
- Recommend where to go for a lunch;
- Remind to ask questions;
- Send a funny GIFs;
- Remind the attendees to check the information cards.
Remember to log into the Eventee mobile app with the same account you use in the web admin in order to be able to use some admin functions inside the app as well. For example you can send newsfeed posts through the mobile app conveniently during the conference.
How to send the GIFs from the mobile app? There are several steps you need to do:
- Log into the Eventee mobile app with the same account you use in administration in order to have special admin functions;
- Download a GIF Keyboard by Tenor from App Store or Google Play and follow the instruction in the app on how to allow GIF Keyboard on your mobile phone;
- Open your event in mobile app Eventee and share the fun with your attendees! ❤️
Don't forget that the more posts you send, the more engagement you are going to get! 💪
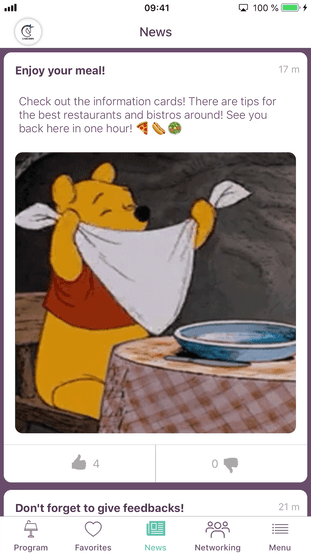
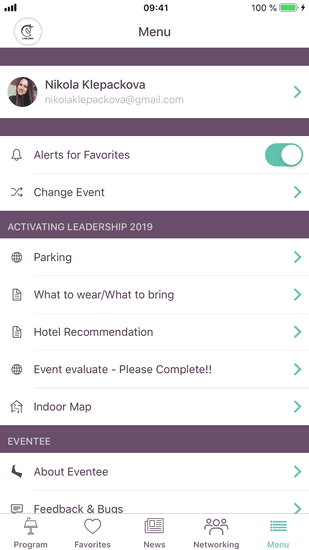
Information cards
Information cards are a good source of information of any kind for your attendees. You can create unlimited number of cards, which will appear inside the mobile app in Menu section. These cards may contain whatever you want to tell to your attendees
- Information about sponsors and links to their websites;
- Hotels/Restaurants recommendation;
- Questionnaire links (final feedback, etc.);
- Pictures of outdoor map of your venue;
- Pictures of indoor map or placement of exhibitors;
- Links to download all presentation from speakers.
Preview on the mobile app:
Social Networks Integration
In the section Engagement in your admin panel, besides the Newsfeed, you can also find an Integration of Twitter and Instagram. What are the benefits of this?
- Increased attendee engagement by sharing pictures and tweets;
- “Free” promotion of your event brand by the attendees;
- Connection of your attendees' social networks profiles.
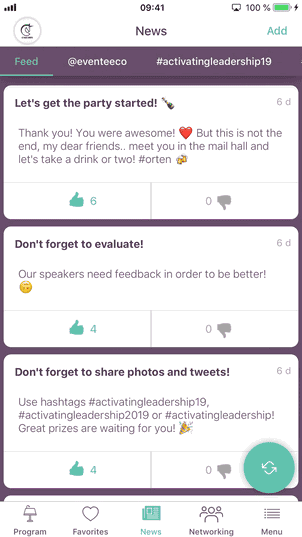
Firstly, you have to come up with a list of hashtags which you want to use for your conference. It could be basically anything related to your conference - if you have a conference named “Activating Leadership 2019”, it could be simply activatingleadership19 or acitavtingleadership2019. Write them without the symbol "#". Do the same for Instagram and Twitter. However, avoid using general hashtags and try to use more specific ones related to your event. Be aware that all the tweets and pictures which have ever been used with the hashtags you choose will be seen in Eventee. For example, activatingleadership will not be a good choice because there are a lot of posts which have already been posted with this hashtag.
Moreover, you can add your Twitter account and all the tweets from your account will be shown in the application.
How to encourage your attendees to use the hashtags?
- Show the hashtags on visible places - spread them in the venue, add them to a presentation or send them by email;
- Create a competition and motivate your attendees to share photos (for example the craziest photo of the event wins a prize)
Please, don't forget that the attendees need to have a public profile on Instagram in order to show her/his posts in Eventee. Remind the attendees to do so. 😊
Networking
In Settings -> Features, you can turn on a Networking function. What are the benefits of this feature?
- Attendees can create valuable business connections;
- Attendees can network during a day, they can chat, they can set an appointment;
- Each attendee can decide who he/she wants to meet and who not - this ensures that your attendees will not be contacted by people they don't want to meet.
How does it work? Each attendee who wants to network has to fill in a short personal profile. Afterwards, they can meet the others, by simple swiping left or right. Once they match, they can start chatting and setup a meeting right at your event.

You can motivate the attendees to network and remind them during the day that they don't need to wait for the evening party. Networking couldn't be any easier! 🤝
Live Questions
Did you know that the fear of public speaking is believed to affect up to 75 % of the population? It means that there are probably people in your audience with interesting questions, but are too shy to ask it aloud. Thats where live questions feature comes into action:
- Enables to ask questions through Eventee, with a real name or nickname;
- Enables the attendees to vote for the most interesting ones;
- Each session has a separate list of questions
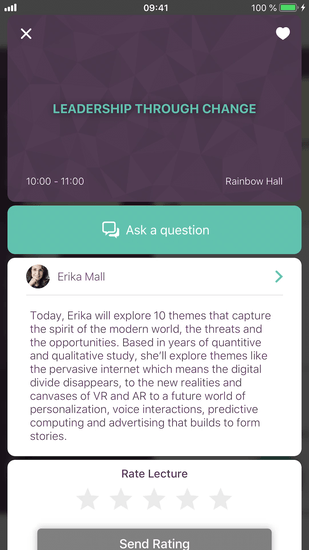
How does it work? You have to allow Live Questions in Agenda for the particular lectures. The list of the lectures which have Live Questions allowed you can find in tab Engagement -> Live Questions. During the lecture, click on it in this list and turn on a "Projector mode". Now you can display the questions in a full-screen mode to all of the attendees.
You, as an administrator, have a competence to delete questions which are similar or not proper to ask. The only thing you need to do is to be in Eventee mobile application logged with the same account as in admin. After that, by clicking on “Ask a question” in individual lectures, you can observe the questions which are asked and with left swipe delete them, if necessary. Moreover, with a right swipe you can hide the ones which have already been asked.
Additional features
In the Settings you can see Features section. Here you can decide which features you want to use on your event and which not. Besides already mentioned Newsfeed and Networking, you can allow following features
PIN code
Do you want to keep your event private? PIN code feature
- Enables to lock your event with a PIN code;
- Users of Eventee app can view your event only with the correct PIN code.
Whitelist
Whitelist is a feature which works similar as PIN code - it ensures keeping your event private. However, unlike PIN code, Whitelist means that only the people you invite either by adding their emails into Eventee or by importing them from Eventbrite could view and open your event in Eventee.
- Enables to keep your event private;
- Give the access to your event only to invited attendees or imported attendees from Eventbrite
Public API
You can generate your own API token. With API access
- You are able to update the agenda of an event;
- You can share the login information between Eventee and your site.
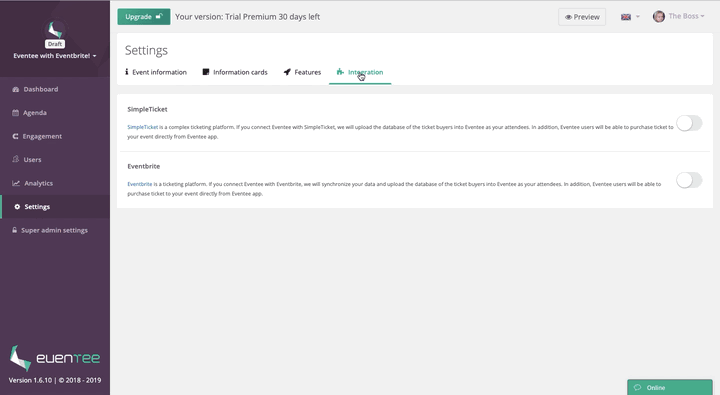
Integration with ticketing systems
If you sell your tickets through Eventbrite or SimpleTicket (only for Czech Republic), this would be a feature for you! In Settings -> Integration you can turn on integration with SimpleTicket or Eventbrite.
If you do so, we will synchronize your data (event information) and upload the database of the ticket buyers into Eventee as your attendees. After publishing your event, the attendees will be invited via email and when they accept the invitation, they would be able to find their tickets in Eventee app.
How does that work?
You can set the integration within a few steps:
1. Firstly, go to the tab Settings and click on Integration. Here you can see two ticketing platforms - SimpleTicket and Eventbrite. (SimpleTicket is in progress and we believe it will be ready within one month.)
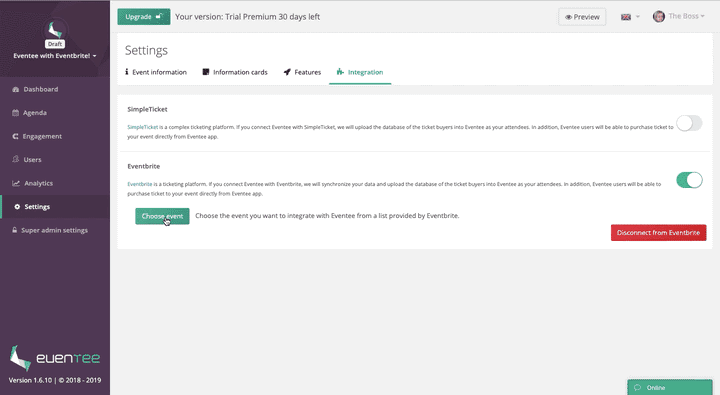
2. Turn on Eventbrite integration and click on Allow access. By clicking on Allow at Eventbrite site, you will allow Eventee the access to your Eventbrite data. If you are not logged in at your Eventbrite profile, you have to log in beforehand.
3. Right now, you have the Eventee account and Eventbrite account integrated. Now you have to choose the specific event which you would like to integrate with Eventee. The list of the events is identical with the events you have created/you are administrating in Eventbrite.
4. Lastly, you have to choose which information you would like to synchronize. As for the event information and logo, you can decide if you want to synchronize continuously (if you update anything in Eventbrite, we will update it automatically in Eventee) or just once. Attendees are synchronized continuously.
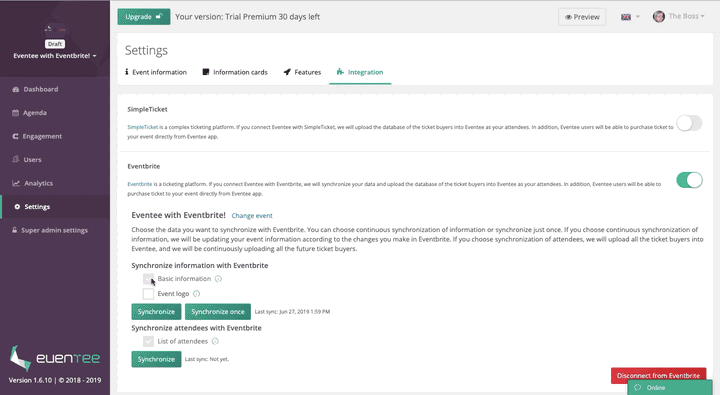
5. And that's it! You can see the attendees in Eventee as soon as they buy tickets at Eventbrite, they have the label “Imported”.
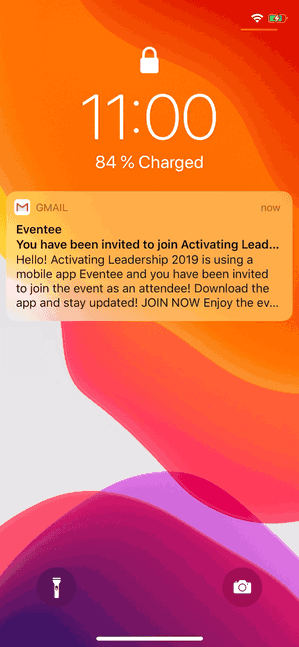
Automatic invitation
When you are ready to publish your event, we will send them an invitation mail to download and use Eventee to the email address which they provided to Eventbrite. When they log in to Eventee, they will have their ticket with a unique QR code ready for a check-in right in the app!
Once you have everything prepared, you can pay and publish your event. Please, make sure that you have filled in all the necessary information. Furthermore, remember that even after publishing you still can make changes in agenda or settings. The changes will be visible immediately in the mobile application
As soon as your event is published, you will receive an email. Right after that you should spread the information that you use Eventee mobile app among the attendees and encourage them to download it and log in to your event.
If you have your event integrated with Eventbrite or SimpleTicket, right after the publication we will automatically invite all the attendees to join your event in Eventee.
If you don't have the integration with any ticketing platform, you have several other options to motivate the attendees to download and use Eventee:
- Invite the attendees straight from the admin panel;
- Download QR code or copy the Magic link from your Dashboard and publish it on your website or social media pages;
- Send the QR code or Magic link via email to your attendees;
- Use a link to download the app directly from App Store or Google Play and share it with your attendees. After downloading, the attendees can easily find your event in the app.
Invite the attendees from admin panel
You have two options for inviting the attendees from admin panel:
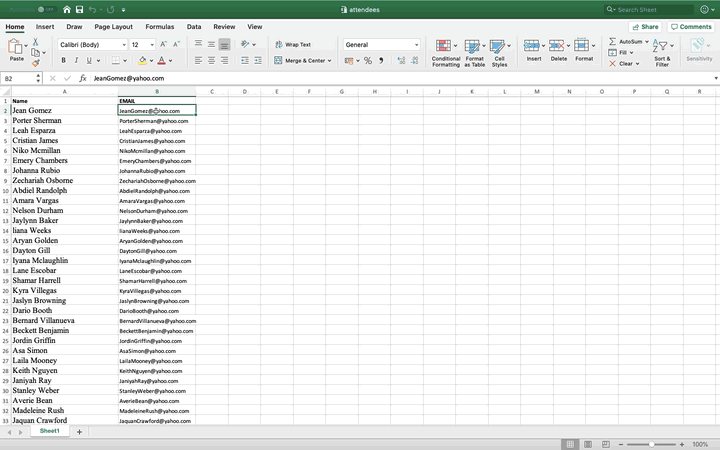
Upload a file in .txt, .tsv or .csv format
Firstly, you have to save your excel file with a list of contacts to your attendees in a .txt, .tsv or .csv format. After that, you can easily upload the file into the administration. We will send the invitation email to your attendees with the instructions to join your event in Eventee instead of you, and you can easily track the status of the invitation:
- "Pending" - The attendee did not joined your event in mobile app Eventee;
- "Attendee" - The attendee has downloaded mobile app Eventee and has joined your event.
Write or copy each email address on a single row
You can easily use copy and paste and copy all the email addresses of your attendees from the excel file into the administration.
If you have your event integrated with Eventbrite or SimpleTicket, right after the publication we will automatically invite all the attendees to join your event in Eventee.
And how does the invitation email look like? We will send the attendees a Magic link hidden in a button "Join Now" which is unique for each individual event.
When the attendees open the invitation email in a computer, notebook or tablet and click on "Join Now" , they will be instructed to scan the QR code
QR code works as a deeplink. When your attendees scan the QR code, they will be directed to App Store or Google Play to download Eventee app. After downloading and registration, they will get right into your event. If they already have Eventee app downloaded, with scan they will straightly open your event.
When the attendee open the invitation email in a mobile phone and click on a Magic Link "Join Now", they will be directed to App Store or Google Play to download Eventee app. It works the same as the QR code - after downloading and registration, they will get right into your event. If they already have Eventee app downloaded, with a click they will straightly open your event.
Remember that the more encouragement the attendees will receive from you, the higher the download rate is going to be. We also wrote a special article about this topics, feel free to read through: How to boost the usage of Eventee at your event. 🙂
REALIZATION PHASE
We know that event organizing is challenging, especially the day of realization. However, Eventee can significantly help you to achieve a smooth running. Here are some tips for you which you should not forget in order to maximize the impact of Eventee on your conference
- Log in to Eventee with the same account as you are in Admin in order to have special functions as an admin of an event - you can add posts into newsfeed through a mobile app and manage live questions from attendees;
- Make real-time changes in agenda - if it is necessary, postpone the timing of schedule, every change gets updated in the app right away;
- Spread the QR code through the venue together with the hashtags relevant for your event;
- Remind the attendees to download and use the app, remind them more than just once;
- Explain the attendees which functions they can use and how - encourage them to network and to share photos and tweets;
- Remind the attendees that they can find all the information cards in the application;
- Use Newsfeed - schedule the important messages in advance and additionally use it during the event;
- Remind the attendees to give feedback to the speakers after each lecture. You can motivate them by making a competition as well;
- Make a competition in order to support your attendees to share pictures and tweets from your event.
EVALUATION PHASE
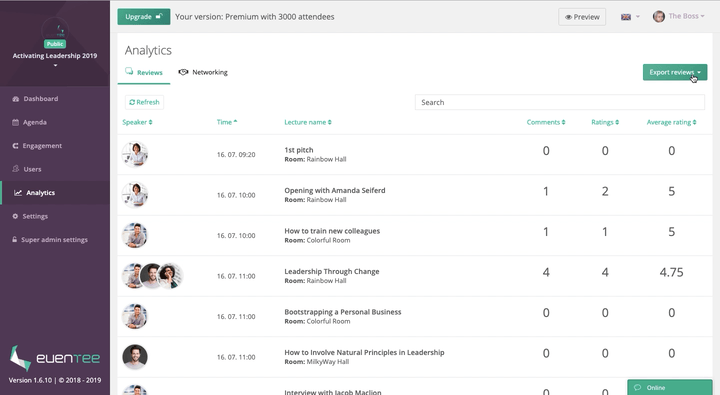
Export the Reviews
Go to the Analytics as look on the screen. There are all the reviews which your attendees gave to your speakers. You can download them in the format according to your wish. You can easily sort the information and make summaries of attendees' feedback to each individual lecture. 💪
Networking analytics
In the tab Analytics -> Networking, you can see how many attendees have turned on the networking feature, the number of connections they made and the number of messages they have sent to one another. You can also observe the usage of networking in a time. 🧐
If you have any questions or wishes, please, contact us on [email protected]. We are here for you, ready to help. Good luck! 🤩

Subscribe to Eventee blog
Get latest posts delivered right to your inbox
Thank you! Your submission has been received!
Oops! Something went wrong while submitting the form.